Aarrgghh!! It’s so annoying. Why can’t you just idle? Yea, I know the feeling. This is a common ATV complaint.
An ATV that dies when the choke is off is symptomatic of a dirty pilot jet in the carburetor. Removing and cleaning the carburetor will fix the problem. Other possible issues include:
- Incorrect air/fuel mixture ratio
- Faulty carburetor
- Vacuum leak
This is a common ATV complaint, especially ATVs that lay up for a time. In this post, you’ll learn why your ATV only runs with a choke and what you can do to fix it. You’ll also learn how to adjust the air-fuel mixture correctly, and we’ll cover the basics of air-fuel ratio.
This post covers carburetor engines; if your bike is fuel injected, stumbling at idle may be caused by several components, including the fuel injector, air flow meter (if fitted), TPS, intake temperature sensor, etc., the best place to start diagnosing a fuel-injected bike is by reading the ECU fault codes and checking gas quality, air filter, and the spark plug should be checked.
We’ll look at the importance of air-fuel ratio first as it helps to have a mind map of what’s going on; however, if you want to get down to the nuts and bolts of the repair, jump ahead to pilot jet cleaning here.
What’s Air Fuel Ratio (AFR)
The simplest fix to this problem can be a quick adjustment of the air-fuel mix screw, and you can read all about doing that here. However, as you’ll discover, adjustment often isn’t usually the cause of the problem.
Your ATV needs air to fuel ratio of 14.7 parts air to 1 part gas. Any variation of this ratio and the engine is said to be either “Running lean” or “Running rich.”
A lean condition can cause your engine to run excessively hot, and a rich condition can wash the protective oil coating the cylinder and dilute the engine oil.
Both conditions will cause your engine to run poorly and should be fixed as soon as possible. If neglected, both conditions put your ATVs engine in real danger of failure.


Lean condition
A lean condition is a lack of gas in proportion to the volume of air an engine receives. Any proportion above 14.7 parts air to 1 part gas is a lean condition.
Causes of lean condition – A lean condition can be caused by either not enough gas in the combustion chamber mix or too much air.
Not enough gas in the mix is easy to imagine, a fuel blockage or poor mix adjustment, but how could there be too much air in the mix?


As your carburetor is under vacuum, the engine will draw air from wherever it can get it. A damaged carburetor mounting gasket or manifold will allow un-metered air in. A vacuum leak around the air/fuel mix screw is possible too.
On the mechanical side, a damaged head gasket, valve adjustment, or damaged valve seats will allow unmetered air into the combustion chamber, thereby creating a lean condition.
If air doesn’t pass through the carburetor intake (Venturi), it’s not mixed to proportion.
Lean condition symptoms – These can vary; the most common include:
- Non-starting
- Starting and dying
- Only runs with choke
- Engine surging, engine runs erratically
- Engine stalls when hit the gas
- Engine won’t idle
- Engine rpm high
- Very hot running engine
- White spark plug
- Engine misfiring
Rich condition
A rich condition means there’s too much gas in the combustion chamber in proportion to air. Any proportion below 14.7 parts air to 1 part gas is a rich condition.
Causes of a rich condition – A rich condition can be caused by either too much gas in the mix or not enough air. Common causes of a rich condition include Air/fuel mix screw out of adjustment, faulty carburetor, faulty carburetor needle seal, dirty air filter, air box, or trunking obstruction.
Rich conditions symptoms – The symptoms vary; the common ones include:
- ATV stinks of gas when starting
- Engine floods easily
- Tailpipe blows black smoke
- Oil level higher than the full mark
- Black plug
- Engine misfiring
Adjusting Air Fuel Ratio
The AFR can be adjusted and will need to be adjusted as a carburetor and engine wear. Carburetors are set from the factory, and some may even have a tamper-proof screw to prevent adjustment or major adjustment swings. Incorrect adjustment can, as you know, be harmful to your engine.
Most carburetors will have two adjustment screws, an idle speed screw, and the air/fuel mix screw.


The idle screw adjusts the idle speed of the engine. It simply opens the throttle butterfly flap. Think of it as a doorstop. It has no other function. It may be part of the throttle assembly cable on some carbs.
The air/fuel mix screw is the business end of setting the carburetor mix. The screw (brass flat head usually) will be accessible as it needs to be adjusted while the engine is running.
Adjusting the AFR is as follows:
- The engine should be warm
- Go ahead and find the brass mix screw and turn it all the way in (clockwise) until it seats. Don’t tighten it as it’s a delicate screw and could break.
- Now back the screw out one and a quarter turns.


- Start the engine and attempt to idle the engine; keep adjusting the screw out (anti-clockwise) until the engine will idle.
- Now, snap the throttle sharply: If the engine bogs (hesitates), keep adjusting the screw out until it doesn’t. When you find that sweet spot, open the screw about another 1/8 turn. If, on the other hand, after the initial adjustment, the engine doesn’t bog when you snap the throttle: Adjust the screw back in until it does, and then back the screw out again in small increments until it doesn’t, then finally back it out another 1/8 turn.
- You may need to adjust the idle screw afterward. Turning it inwards (clockwise) increases the rpm, and anticlockwise lowers the rpm. The engine should idle smoothly, and not be difficult to select gears (manual gearbox).
If this hasn’t worked, then go ahead and clean the pilot circuit.
Dirty Carb Causes Lean Condition
As your ATV only runs with choke, it means your engine is running lean. If adjusting the AFR didn’t solve the problem, then the lean condition is most likely caused by a dirty fuel jet and, in particular, the pilot jet.


Carburetors commonly employ three (some more) fuel jets that are responsible for feeding gas to fuel circuits which in turn are activated by various throttle demands.
When diagnosing throttle issues, it helps to know which circuit controls what:


- Idling and stumbling issues to 1/4 throttle (our problem) – check the pilot circuit as it’s responsible for gas supply from idle to 1/4 throttle) try adjusting the fuel mix screw first.
- Stumbling in the 1/4 to 3/4 throttle – check the needle jet is clean and try adjusting the clip position.


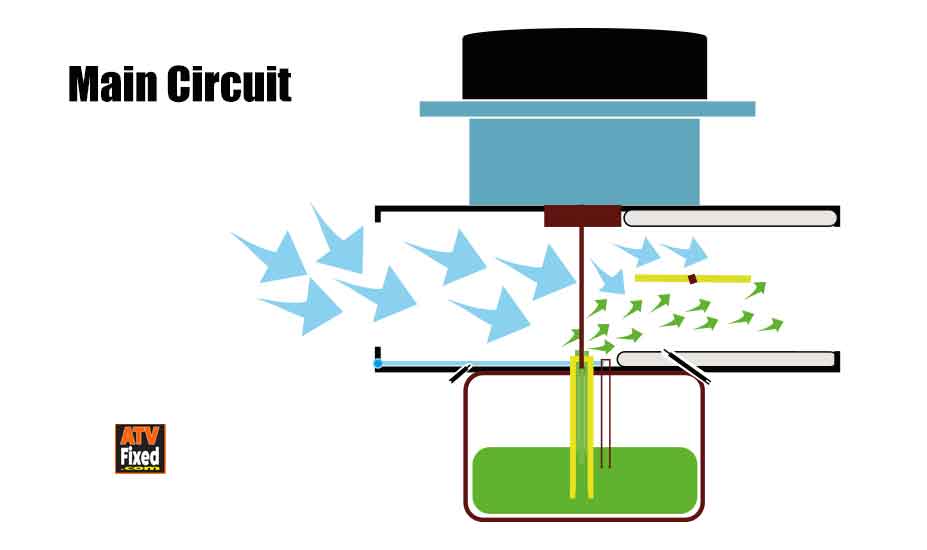

- Stumbling from 3/4 to full – check the main jet is clean and consider rejecting the carburetor (especially if it’s had some engine mods)
- Engine dies with throttle snap – check Accel pump, timing, and leak jet operation.


The needle jet is from quarter to three-quarters throttle, and the main jet is responsible from three-quarters to full throttle.


The partially blocked pilot (idle) jet reduces the amount of gas being fed to the engine at idle, which in turn causes it to stumble and stall.
Applying choke reduces the volume of air entering the engine, adjusts the ratio closer to 14.7 to 1, and allows your engine to run smoothly again, but obviously, this isn’t a workable solution.
The fix is, as you know, to clean the pilot jet. But just before we do that, we should check two easy-to-check critical components that could also cause idle issues –
Gas quality and spark plug.
Bad Gas
Gas goes stale, and blended gas can go stale after about a month under certain storage conditions. Stale gas loses its ZING, and so your engine may struggle to run and lack power. If your gas is old, drain the tank, and carburetor bowl, and refuel.
Carburetor gumming is the next stage of stale gas, and it’s a real problem, especially with ATVs that lay up over winter.


The stale gas inside the carburetor bowl eventually evaporates and leaves a sticky gel that blocks up the main carburetor jet.
This is a condition that affects all small engine kit, from ATVs to mowers.
If your ATV has been sitting idle for a time, it increases the chances that gumming is causing your problem. The only fix here is to remove the carburetor and clean it thoroughly with carb cleaner or in an ultrasonic cleaning tank.


Gumming can be prevented, though; you can use a gas stabilizer in the fuel when storing. A stabilizer will keep the gas fresh for up to one year. A full gas tank helps prevent moisture buildup too.
Spark plug
Your spark plug is critical to how well your engine runs and is high on every list of problem gas engines. The symptoms of a faulty or incorrect spark plug vary, so much I’ve learned to eliminate it early in the diagnosing process. It takes moments to check and can save you a ton of time.
Your engine maker will specify a particular spark plug by code; we’ll need to be sure the correct plug is fitted. Plugs are graded by heat, and importantly, a plug should get just hot enough to burn off contaminates but not so hot that it causes preignition. An incorrect heat range will cause a ton of issues.


Pull the plug and read the condition:
- Tan insulator – a healthy plug
- Black plug – running rich
- White plug – running lean
- Oily plug – mechanical issue
With the plug removed, go ahead and check the gap and clean it.


Use a feeler gauge to check gap.
Removing & Cleaning the Pilot Jet
With those checked, now let’s get down to the business of cleaning the pilot circuit. To clean the pilot jet, it may be necessary to remove the carburetor. Some carburetors will be easier to remove than others. It is possible on some models to remove the jet without removing the carburetor.
To do that, you’ll need room to work below the carburetor, so if you’ve got the space go ahead, turn off the fuel tap, and remove the fuel bowl. The bowl lives at the base of the carburetor and is a reservoir of fuel that stands ready to feed the jet.


Grit that makes it past the gas filter usually hides in the base of the bowl. Most bowls are fitted with a drain screw, which is useful for maintenance. It is worth draining the fuel bowl; it often fixes poor running issues.
Bowl Screws – The bowl is fixed to the carburetor, usually 2 or 4 screws. Here’s where you’ll need the space we spoke of earlier to work the screwdriver. A short-handled butty screwdriver and bit set is the go-to tool for this job. Be sure your driver fits snugly. These screws are often damaged and can be tricky to remove when the carb is on the engine.
Gas Tap – Your gas tap needs to be set to the off position, as gas will flow as soon as you remove the bowl. You’ll find your gas tap by following the gas line between the tank and the carburetor. The tap will be marked on and off. If you can’t find it, do not worry. Use a fuel line clamp or small vice grips to gently pinch the line.
Bowl Seal – With the bowl removed, you may find a rubber bowl seal on the bowl or carb side. If it’s in place, best to leave it there, these guys can expand when removed and can be difficult to refit correctly, especially when the carb is on the engine.
Rinse the bowl with some carburetor cleaner and set it aside.


Needle Seal – The plastic/metal float and needle control the flow of gas to the bowl. Removing the float pin releases the float and needle. The needle is small, so I’ll lay a workshop cloth out to help catch it.
A faulty needle valve or incorrect float height could cause fuel starvation. Needle seals are a wearing part and can be replaced. The rubber seal often turns pink when old and worn.
Pilot jet – We want to locate the pilot jet, as it is the fuel circuit most likely to cause an idling issue.
That said, it makes sense to remove all jets and clean them while we’re in here.
Main Jet – The main jet isn’t as impressive as its name suggests. Jets are made from brass and resemble a small hollowed-out screw.

You’ll need your butty driver and bit set again, brass is corrosion resistant, and that’s great for a carburetor, but brass is a soft metal, and an ill-fitting screwdriver can easily strip the jet head. A proper fit is mission-critical here.
The jet may be cleaned with a wire brush strand and some aerosol carb cleaner. The screw hole must be clean.
Needle Jet / Emulsion Tube – The emulsion tube is also made from brass. Not every carb will have one. It depends on carb type. The tube employs multiple carefully calibrated portholes in the wall, which all feed gas to the engine.
Over time, these holes get smaller as microscopic grit attaches to the edges. This may not be obvious on first inspection, but as you clean a porthole, you’ll see the difference.
The size of the portholes in the jet and tube is important as they are calibrated to suit the size of your engine. Use some carburetor cleaner and a strand from a wire brush or copper wire strand from an electrical cable. Using a more abrasive tool like a micro drill bit will make the portholes bigger, which will negatively affect the AFR.
That’s it; rebuild your carburetor in reverse order, turn your gas on, and check for gas leaks before starting and testing.
Faulty Carburetor
A faulty carburetor is also common, don’t rule it out. They are precisely calibrated bits of kit and do wear out. Unfortunately, you won’t likely be able to tell if a carburetor is faulty by just looking at it.
But if you’ve eliminated bad gas, dirty carb, fuel supply issues, vacuum leaks, and mechanical issues like head-gasket, valve leaks, go ahead and change it out for a new one.
Related Questions
Is it bad to run an engine with the choke on? Running an ATV with the choke on risks excessive gas washing the protective engine oil from the cylinder. The gas makes its way to the crankcase and dilutes the engine oil.
You may find the following posts useful:
I’ve written a ton of ATV troubleshooting posts. Hopefully, you won’t need them, but if you do, we have you covered.


- About the Author
- Latest Posts


John Cunningham is a technical writer here at ATVfixed.com. He’s a Red Seal Qualified Service Technician with over twenty-five years experience. He’s worked on all types of mechanical equipment, from cars and trucks to ATVs and Dirt bikes.